Easy 3D Origami Penguin: Step-by-Step Tutorial
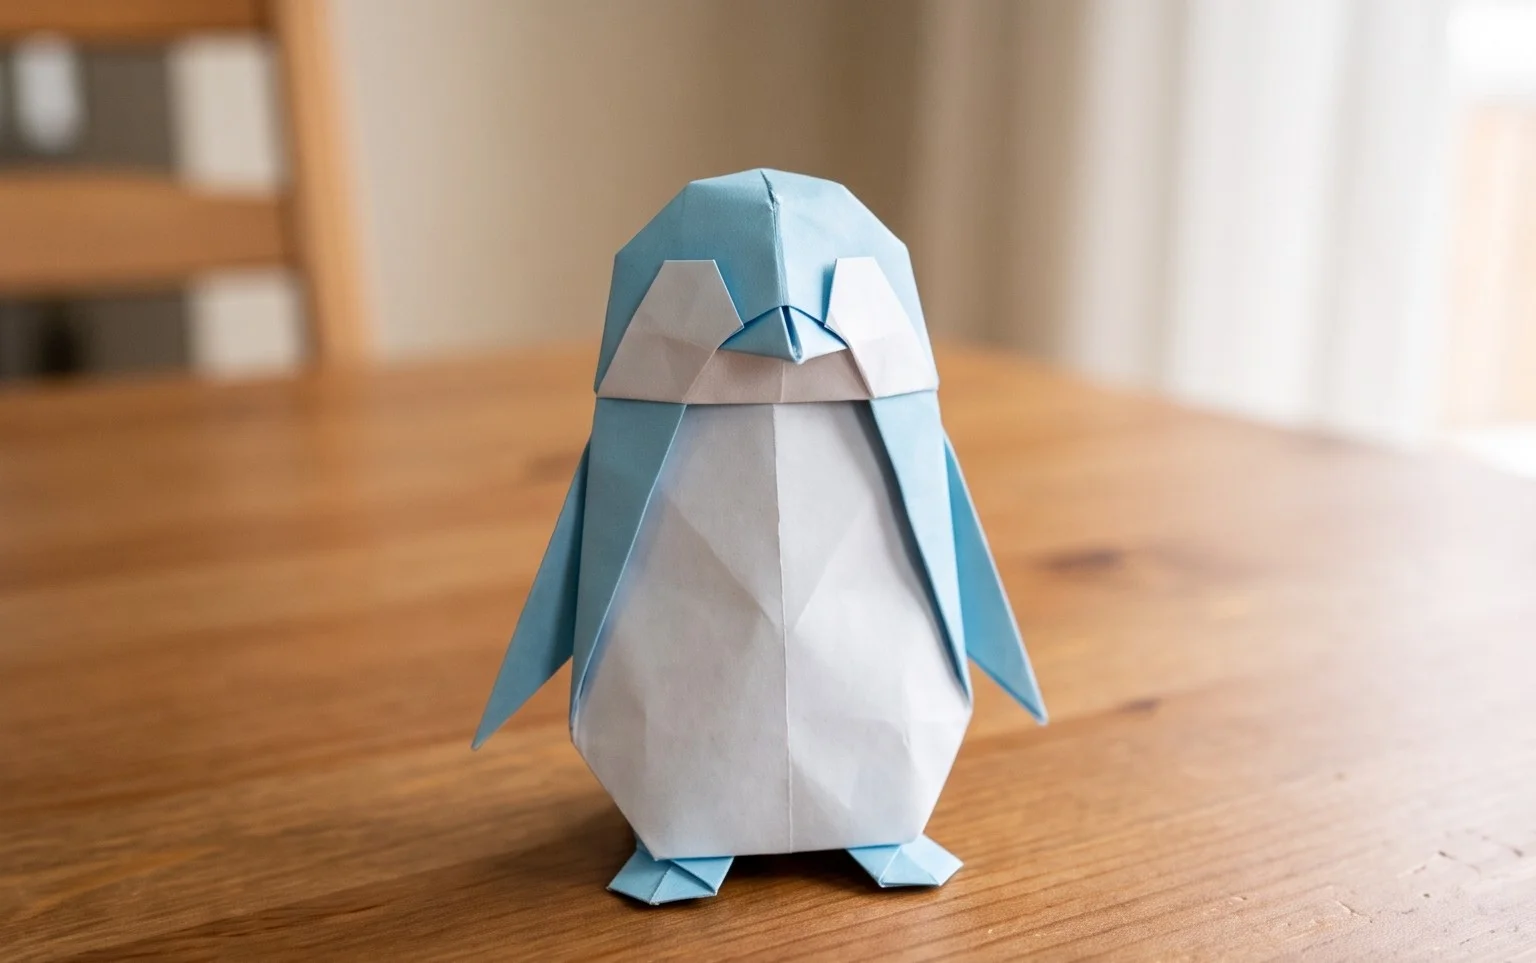
3D Origami Penguin! Get ready to create your very own adorable, plump little penguin, all ready to waddle into your heart! Imagine a charming, rounded body with a sweet, upturned beak and those iconic black and white markings, standing proudly as if ready for a chilly adventure. This project is absolutely perfect for complete beginners and kids alike, making it a wonderful activity for a rainy afternoon or a fun way to craft a unique handmade gift or a delightful piece of decoration. In about 30-45 minutes, you’ll transform simple paper into a cheerful companion. We’ll be learning the magic of modular origami, folding individual triangle pieces and then assembling them to bring our penguin to life. Let’s get folding and have some fun!
Creating Your Own Adorable 3D Origami Penguin
Hello there, fellow paper crafters! I’m so excited to guide you through the delightful process of folding your very own 3D origami penguin. These charming little creatures are surprisingly easy to make once you understand the basic techniques, and they bring a smile to everyone’s face. This tutorial is designed for beginners, so don’t worry if you’ve never folded origami before. We’ll go through each step slowly and clearly, so you’ll have a wonderful penguin friend in no time.
Choosing Your Paper: The Foundation of a Great Penguin
The right paper can make a big difference in the success and appearance of your origami. For this penguin, I recommend using standard origami paper. This paper is specifically designed for folding, meaning it’s thin enough to make multiple folds without becoming too bulky, yet strong enough to hold its shape.
* **Type:** Regular origami paper is ideal. It’s typically sold in squares and has a lovely crispness that makes folding precise.
* **Weight:** Most origami paper falls within a range of 60-80 gsm (grams per square meter). This weight is perfect for our penguin. Avoid cardstock or construction paper, as they are too thick for the smaller, intricate folds required.
* **Size:** For your first penguin, I suggest starting with a 6-inch (approximately 15 cm) square. This size is manageable for learning the folds and produces a good-sized penguin. You can experiment with larger or smaller squares later.
* **Single or Double-Sided:** For this penguin, I recommend using single-sided origami paper. This will allow you to have a nice solid colour for the main body of your penguin, and then a contrasting colour for its belly. If you only have double-sided paper, that’s perfectly fine too! You’ll just have a penguin with a coloured belly of the same colour as its back. If you’re feeling adventurous, you can even try using patterned paper for a unique look, but for your first attempt, a solid colour is best.
Mastering the Base Folds: The Building Blocks of Origami
Before we dive into the penguin itself, let’s get familiar with two fundamental origami folds that we’ll use repeatedly. Practicing these will make the rest of the process much smoother.
The Valley Fold
A valley fold is when you fold a piece of paper towards you, creating a crease that looks like a valley. Imagine folding a piece of paper in half so the crease forms an inverted “V.”
To make a clean valley fold:
1. Align the edges or corners you intend to fold together precisely. Even a tiny misalignment at this stage can affect the final model.
2. Once aligned, press down firmly along the intended fold line with your fingernail or a bone folder. Start from one end of the fold and smoothly run your finger along the crease all the way to the other end. This ensures a sharp, crisp line.
The Mountain Fold
A mountain fold is the opposite of a valley fold. You fold the paper away from you, creating a crease that looks like the peak of a mountain.
To make a clean mountain fold:
1. First, you’ll typically make a valley fold in the opposite direction. So, if you’ve just made a valley fold, the paper is already creased.
2. Now, you want to reverse that crease. You’ll essentially be folding the paper back on itself along the existing valley crease, but folding it away from you.
3. Just like with the valley fold, align carefully, and then press down firmly along the crease line from one end to the other.
If you’re using a pre-creased line, you’ll want to identify whether it’s intended to be a valley or mountain fold based on the instructions. A good trick for mountain folds is to imagine you’re trying to make the paper look like the roof of a house.
Your Penguin’s Journey: A Step-by-Step Guide
Now that we’ve got our paper and have practiced our basic folds, let’s get folding our adorable penguin!
1. Start with your square of origami paper. If you are using single-sided paper, begin with the coloured side facing down and the white side facing up. If your paper is double-sided and you want a white belly, start with the white side facing up.
2. Fold the paper in half diagonally. Bring the bottom right corner up to meet the top left corner. Crease firmly. Unfold.
3. Now, fold the paper in half diagonally the other way. Bring the bottom left corner up to meet the top right corner. Crease firmly. Unfold. You should now have an “X” crease on your paper.
4. Turn the paper over so the coloured side is facing up (or the side you want to be the main colour of your penguin).
5. Fold the paper in half horizontally. Bring the bottom edge up to meet the top edge. Crease firmly. Unfold.
6. Fold the paper in half vertically. Bring the right edge over to meet the left edge. Crease firmly. Unfold. You now have a grid of creases on this side.
7. Now for a slightly trickier but very common origami fold: the preliminary base. With the coloured side still facing up, gently push the left and right sides of the paper inwards along the vertical crease you just made. As you do this, the top part of the paper will naturally want to collapse downwards along the diagonal creases. Bring the top point down to meet the bottom point, creating a square shape. This is your preliminary base. You should have an open flap at the bottom and a closed point at the top.
8. Orient your preliminary base so the open end is facing you. Take the top layer of the right flap and fold its bottom edge to meet the centre vertical crease. Crease firmly.
9. Repeat step 8 with the top layer of the left flap. Fold its bottom edge to meet the centre vertical crease. Crease firmly. You should now have a kite shape on the top layer.
10. Now, take the top triangular flap you just created and fold it down. The point of this triangle should extend slightly past the bottom edge of the kite shape you just formed. Crease firmly.
11. Now, unfold the last three folds (steps 8, 9, and 10). You’ll see the creases you’ve made.
12. This is where we’ll use a technique called a petal fold. Lift the bottom point of the top layer upwards. As you lift, use the creases you just made in steps 8 and 9 to bring the sides of the flap inwards. The top point will come up and flatten down, creating a diamond shape. This is called a petal fold. You should now have a smooth diamond shape on the top layer.
13. Turn the model over and repeat steps 8 through 12 on the other side. You should now have a symmetrical diamond shape. This is your bird base, and it’s a foundational base for many origami models!
14. Orient your bird base so the open end is facing away from you. You will see two “legs” at the bottom. Take one of these legs and fold it upwards, aligning its tip with the top point of the diamond. Crease firmly.
15. Repeat step 14 with the other “leg.” Fold it upwards, aligning its tip with the top point. Crease firmly. You should now have a long, narrow shape with two points sticking up at the top.
16. This is where our penguin starts to take shape. We need to fold the head and tail. Take one of the upper points and fold it down at an angle. This will become the penguin’s head. Experiment with the angle to get the look you like. Crease firmly.
17. Now, take the other upper point and fold it down, also at an angle. This will be the penguin’s tail. You can make this fold a bit flatter or more pronounced, depending on your preference. Crease firmly.
18. Now, we’re going to create the penguin’s belly. Look at your model. You should see two flaps on each side. Take the right flap and fold it inwards. The edge of this flap should align with the centre vertical line of your model. Crease firmly.
19. Repeat step 18 with the left flap. Fold it inwards so its edge aligns with the centre vertical line. Crease firmly. You should now have a more slender shape.
20. Now, we need to shape the body. Take the right side of your model and fold it inwards, making a crease that runs from the bottom of the model up towards the neck area. This fold will create the rounded side of the penguin’s body. You’ll want to fold it so it’s not perfectly flat, but gives it a curved appearance. This is a bit of a freehand fold, so don’t be afraid to adjust. Crease firmly.
21. Repeat step 20 on the left side. Fold it inwards to mirror the fold you just made on the right side, creating a symmetrical curved body. Crease firmly.
22. To make the penguin stand, gently open the bottom of the model. You can gently press the base outwards to create a wider, more stable footing.
And there you have it! Your very own 3D origami penguin. Give it a gentle squeeze to ensure all the creases are sharp and it stands up proudly.
Common Pitfalls and How to Avoid Them
Even with clear instructions, it’s common to encounter a few hiccups when you’re starting out. Here are some places beginners often go wrong and how to steer clear of them:
* **Imprecise Folds:** The most frequent issue is not making creases sharp and accurate. This can lead to a wobbly penguin that doesn’t hold its shape.
* **Solution:** As I mentioned earlier, always align your edges and corners perfectly *before* creasing. Use your fingernail or a bone folder to make your creases as sharp as possible. Practice the valley and mountain folds until they feel natural. Patience here pays off immensely!
* **Misunderstanding the Preliminary Base/Bird Base:** Steps 7-13 involve creating the preliminary and bird bases, which are crucial. If these are not done correctly, the rest of the model will be difficult to fold.
* **Solution:** Take your time with these steps. If you’re unsure, don’t be afraid to unfold and try again. Visualize the paper collapsing inwards. For the petal fold (step 12), focus on using the existing creases to guide the paper. It’s like an internal accordion fold.
* **Overly Aggressive Folding on Delicate Areas:** Towards the end, when shaping the body (steps 20-21), it’s easy to press too hard and accidentally flatten the curves.
* **Solution:** These folds are about gently shaping rather than creating sharp creases. Use a lighter touch and focus on creating a rounded form. You can always adjust the curve by gently pushing and pulling the paper.
Making Your Penguin Unique: Variations to Explore
Once you’ve mastered the basic penguin, the fun doesn’t stop there! Here are some ways to personalize your creations:
* **Size:** As mentioned, start with a 6-inch square. For smaller, pocket-sized penguins, try 3-inch squares. For larger, more prominent penguins, use 8 or 9-inch squares. Remember that smaller squares require more dexterity.
* **Paper Pattern:** Instead of solid colours, try patterned origami paper. Floral patterns can give a surprisingly cute and colourful penguin. Geometric patterns can add a modern twist.
* **Colour Combinations:** Get creative with your colour choices! Use a bright colour for the body and a contrasting, light colour for the belly. Black and white is classic, but how about a blue penguin with a yellow belly? Or a pink one with white? You can even use metallic or iridescent papers for a touch of sparkle.
* **Adding Details:** Once folded, you can use a fine-tip permanent marker to draw eyes and a beak onto your penguin. This adds a lot of personality!
Displaying and Gifting Your Penguin Creations
Your finished origami penguins are not just delightful to fold; they also make wonderful decorations and thoughtful gifts.
* **Desk Buddies:** Place them on your desk at work or home to add a touch of cheerful whimsy to your workspace.
* **Seasonal Decorations:** A flock of penguins can be a cute addition to your holiday decor, especially around winter holidays.
* **Party Favors:** Fold a batch of smaller penguins as unique and memorable party favors for guests.
* **Gifts for All Occasions:** Who wouldn’t love a handmade origami penguin? They are perfect for birthdays, thank-you gifts, or just to brighten someone’s day. You can even attach them to gift cards or wrap them around presents.
* **Mobile Creations:** String several penguins together to create a charming mobile for a child’s room or nursery.
* **Dioramas:** Incorporate your penguins into small scenes or dioramas. Imagine a little origami iceberg scene!
I hope you’ve enjoyed folding your first 3D origami penguin. It’s a rewarding process, and with a little practice, you’ll be folding them with ease and creating a whole colony of these charming little birds. Happy folding!
Conclusion
Congratulations on folding your very own 3D origami penguin! Don’t worry if your first attempt isn’t perfect; every crease is a learning experience, and practice truly makes progress. We hope you enjoyed this fun paper crafting adventure. Share your adorable penguin with friends and family – they’ll be amazed by your creation!
Ready for more frosty fun? Try folding a 3D origami snowman or perhaps a cheerful 3D origami polar bear next! There are endless possibilities in the world of paper folding.
Explore More Paper Projects
We invite you to explore more exciting paper projects and discover the joy of bringing simple sheets of paper to life!
