Easy Origami Penguin: Step-by-Step Paper Craft
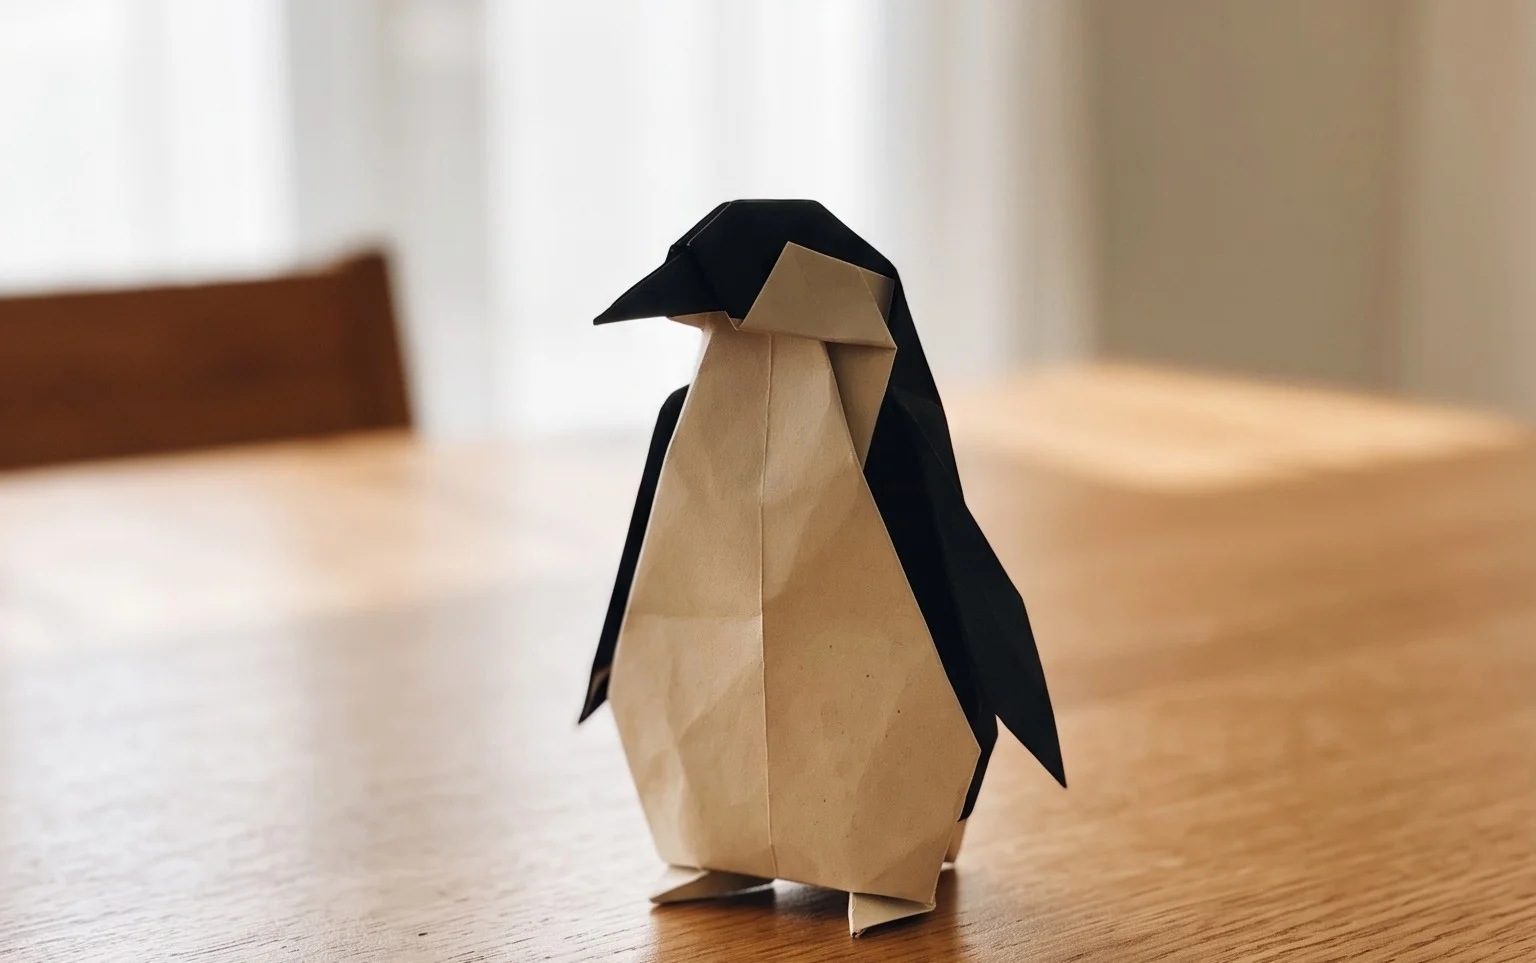
Let’s fold an origami penguin! This charming little bird, once folded, will stand proudly with its distinctive black and white markings and a sweet, slightly tilted head. It’s the perfect project for complete beginners and a fantastic activity for kids to enjoy, taking around 15-20 minutes from start to finish. Whether you’re looking for a fun craft to pass the time, a unique homemade gift, or a cute decoration for your desk, this origami penguin is a winner. Throughout this tutorial, you’ll learn the basics of paper folding, like creating crisp valley and mountain folds, and discover how to transform a simple square of paper into an adorable avian friend. Get ready to unleash your inner folder – I can’t wait to see your little penguin come to life!
Origami Penguin: Step-by-Step Instructions
Hello there, origami enthusiast! I’m so excited to guide you through making your very own adorable origami penguin. This is a fantastic beginner-friendly model, and with a little patience and care, you’ll have a charming little friend in no time. We’ll go through everything you need to know, from choosing the perfect paper to making those tricky folds with confidence. Let’s get started!
Choosing Your Paper
The paper you choose can really make a difference in how your origami penguin turns out. For this project, I recommend starting with standard origami paper. This paper is designed to hold creases well and is a joy to work with.
Type: Look for “kami” origami paper. This is the most common and readily available type. It’s usually a bit stiffer than plain printer paper, which helps the model keep its shape. It’s also typically colored on one side and white on the other, which can add a nice visual touch to your penguin.
Weight: Standard origami paper is usually around 70-80 gsm (grams per square meter). This weight is perfect for this model – it’s substantial enough to give your penguin a good structure but not so thick that it becomes difficult to fold neatly, especially as you get to the later, more intricate steps.
Size: A good starting size for your penguin is 6 inches by 6 inches (15 cm by 15 cm). This size is comfortable to handle for beginners and will result in a penguin that’s a decent size for display. If you want to make smaller penguins, you can try 3 inches by 3 inches (7.5 cm by 7.5 cm), but be aware that smaller sizes can be a bit more challenging to fold precisely.
Single or Double-Sided: For this penguin, single-sided paper is ideal. This means one side is colored (or patterned) and the other is white. When we make certain folds, the white side will show through, which can create a lovely contrast and define different parts of your penguin, like its belly.
Understanding the Base Folds
Before we dive into the penguin itself, let’s get comfortable with a couple of fundamental origami folds. Making these cleanly is the key to a successful model.
Valley Fold: A valley fold is the most common type of fold. Imagine you’re making a crease that creates a “valley” on the paper. To make a valley fold, you bring one edge or corner of the paper to meet another edge or corner and press down firmly along the fold line. The crease will look like an inverted “V” from the side.
Mountain Fold: A mountain fold is the opposite of a valley fold. The crease will look like a pointed “mountain” from the side. To make a mountain fold, you first make a valley fold, then unfold it, and then push the crease in the opposite direction. For this penguin, we’ll primarily be using valley folds, but it’s good to know the difference.
Making Clean Folds: The secret to clean folds is precision and a firm crease.
- Align edges and corners as accurately as possible. Even a slight misalignment early on can make later steps much harder.
- Once you’ve brought the edges or corners together, use your fingernail or a bone folder to run along the crease, pressing down firmly and evenly. This makes the fold sharp and permanent.
- For most steps, we’ll be unfolding after making a crease. This means you’ll make the fold, crease it well, and then open the paper back up. These creases act as guides for future folds.
Numbered Walkthrough: Folding Your Penguin
Let’s get folding! Imagine you have your 6-inch by 6-inch square of origami paper in front of you, with the colored side facing up.
- Diagonal Fold: Bring the bottom right corner up to meet the top left corner. Crease firmly along the diagonal line. Then, unfold the paper. You should now have a diagonal crease going from the bottom left to the top right.
- Second Diagonal Fold: Bring the bottom left corner up to meet the top right corner. Crease firmly along this new diagonal line. Then, unfold the paper. You should now have two diagonal creases forming an “X” on your paper.
- Fold in Half Vertically: Turn the paper over so the white side is facing up. Bring the bottom edge up to meet the top edge. Crease firmly along the horizontal line. Then, unfold the paper.
- Fold in Half Horizontally: With the white side still facing up, bring the left edge over to meet the right edge. Crease firmly along the vertical line. Then, unfold the paper. You should now have a vertical crease and a horizontal crease that intersect in the center of the paper.
- Forming the Waterbomb Base: This step can seem a bit tricky at first, but it’s a foundational origami base. With the white side still facing up, gently push the left and right sides of the paper inwards along the vertical crease you just made. As you push inwards, the top of the paper will start to collapse downwards. Bring the top point down to meet the bottom point, and flatten the paper into a triangle. This is called a Waterbomb Base. Make sure the open edges are at the bottom.
- Folding the Side Flaps (First Side): Look at the triangle base you’ve just made, with the open edges pointing towards you. Take the right flap (which is the top layer of paper on the right side) and fold its bottom edge up so it meets the center vertical crease. Crease this fold firmly.
- Repeat on the Left: Now, take the left flap (the top layer of paper on the left side) and fold its bottom edge up so it meets the center vertical crease. Crease this fold firmly. Your triangle should now look like a kite shape with two flaps folded up.
- Folding Down the Top Point: Take the very top point of this kite shape and fold it downwards. The fold line should be roughly where the two side flaps you just folded meet the center. Crease this fold firmly.
- Unfold the Side Flaps: Now, unfold the two side flaps you made in steps 6 and 7. You should see creases on the paper where you folded them.
- Petal Fold (First Side): This is another key origami move. Lift the bottom point of the top layer of paper upwards. As you lift it, use the creases you made in steps 6 and 7 to guide the sides of the paper inwards. The side edges should fold inwards along those creases, and the top point will continue to move upwards. Flatten the paper down, creating a diamond shape. This is a petal fold.
- Flip and Repeat: Flip the entire model over. Repeat steps 6 through 10 on this side. You’ll fold the side flaps to the center, fold down the top point, unfold the side flaps, and then perform the petal fold. You should now have a diamond shape on both sides.
- Folding the Legs (First Side): Look at your diamond. At the bottom, you’ll see two points that will become your penguin’s legs. Take the right leg and fold it upwards and slightly outwards. The fold should start from the bottom point and go up at an angle. This will form one of the penguin’s legs. Crease firmly.
- Repeat for the Other Leg: Do the same for the left leg. Fold it upwards and slightly outwards, mirroring the fold you made on the right. Crease firmly.
- Flip and Repeat Leg Folds: Flip the model over and repeat steps 12 and 13 to fold the legs on this side. You should now have what looks like a slightly fatter diamond with two points sticking out at the bottom.
- Forming the Head and Body: Look at the top of your diamond. You’ll see a point. This will become the penguin’s head. We’re going to make an inside reverse fold to create the head. To do this, gently open up the top section of the diamond slightly. Push the tip downwards *inside* the model, and then re-flatten the paper, creating a crease that tucks the head inwards. This is an inside reverse fold and can be a bit fiddly. The goal is to make a small, pointed head sticking out.
- Forming the Tail: Look at the very bottom of your model, where the two legs meet. We’ll create a tail by performing another inside reverse fold on one of the leg points. Choose one of the leg points at the bottom and gently open it up. Push the tip downwards *inside* the model, and then re-flatten, creating a small tucked tail.
- Shaping the Flippers: Now it’s time to give your penguin its flippers. Look at the sides of your model. You’ll see the edges that are not part of the head or the legs. We’re going to make a small fold on each side to create the flippers. Fold the top layer of the right side inwards, creating a small diagonal fold. This fold should go from near the “shoulder” area down towards the bottom. Crease firmly.
- Repeat for the Other Flipper: Do the same on the left side, mirroring the fold you made on the right. You should now have two little flaps sticking out from the sides, representing the flippers.
- Final Touches: Gently adjust your penguin. You can slightly bend the legs to make it stand, or gently curve the body to give it a more rounded look. Congratulations, you’ve made an origami penguin!
Common Beginner Mistakes and How to Avoid Them
Don’t worry if your first penguin isn’t perfect! We all make mistakes, and learning from them is part of the fun. Here are a couple of common pitfalls and how to steer clear of them:
- Misaligned Folds: This is probably the most common issue. If your edges aren’t lining up perfectly at the start, it’s going to throw off subsequent folds.
- To avoid: Be patient and meticulous. Take your time to align corners and edges precisely before you crease. If a fold looks off, gently unfold and try again. It’s better to spend a little extra time at the beginning than to struggle with a wonky model later on.
- Failing to Crease Firmly: If your creases aren’t sharp, your model will look soft and might not hold its shape.
- To avoid: After bringing two edges or corners together, use your fingernail or a bone folder to run along the entire length of the crease, pressing down with firm, even pressure. This makes the folds crisp and helps the paper remember its shape.
- Confusion with the Petal Fold (Step 10): This is a more advanced fold that can be a bit confusing for beginners.
- To avoid: Focus on the pre-made creases. The creases you made in steps 6 and 7 are your guides. As you lift the bottom point upwards, gently encourage the side edges to collapse inwards along those existing creases. Imagine you’re “opening up” the flap and letting the sides fall inwards naturally. It might take a couple of tries to get the feel of it.
Varying Your Penguin
Once you’ve mastered the basic penguin, don’t be afraid to experiment! Origami is all about creativity.
- Size: As mentioned, you can use larger or smaller squares of paper. Smaller sizes are great for creating a whole colony!
- Paper Pattern: Instead of solid colors, try using patterned origami paper. Papers with small, repeating patterns can look fantastic on a penguin, giving it a unique texture or look.
- Colour: Play with different color combinations. What about a blue penguin? Or a penguin with a patterned belly? The white side of the paper can also be colored with markers or crayons before you start folding if you’re feeling artistic.
Displaying and Gifting Your Penguin
Your finished origami penguin is more than just a folded piece of paper; it’s a little piece of art! Here are some ideas for what to do with it:
- Desk Buddy: It makes a charming desk ornament. Place it near your computer or on your bookshelf to bring a smile to your face.
- Mobile: If you make several, you could string them together to create a cute origami mobile.
- Gift Topper: A small origami penguin can be a delightful addition to a gift, perched on top of a present.
- Party Favors: For a children’s party, these make wonderful and unique party favors.
- Seasonal Decorations: They can be incorporated into winter-themed displays or even used as part of a nativity scene as little companions.
- Craft Projects: Glue them onto greeting cards, incorporate them into dioramas, or use them in scrapbooking projects.
I hope you’ve enjoyed making your origami penguin! Remember, practice makes perfect, so keep folding, and most importantly, have fun! Happy folding!
Conclusion
Congratulations on completing your origami penguin! We hope you enjoyed this fun and simple project. Remember, the first attempt is always about learning, so don’t be discouraged if your initial origami penguin isn’t perfect. Keep practicing, and soon you’ll be folding with ease!
We’d love to see your creations! Share your finished penguin with friends and family. For your next paper adventure, why not try folding a playful seal or a majestic crane? There are countless wonderful paper models to explore. Keep your creativity soaring!
